Saturday, January 31, 2015

Albondigas Soup


For tonight's "SOUP'S ON" Saturday #2 I've made
 Albondigas Soup. 
 
Albondigas Soup is a classic Mexican soup made with meatballs (albondigas).  I love this soup for its flavor and also for the ease with which it is to prepare.  You can change ingredients to suit your own taste without losing the flavor of the meatballs and vegetables.  And, the aroma of the soup while it is simmering in your soup pot is wonderful!
 
Albondigas Soup (Mexican Meatball Soup)
 
Ingredients:
  • 2 tablespoons olive oil
  • 1 large onion, chopped
  • 1 large clove of garlic, chopped
  • 3 quarts of beef stock OR chicken stock.  (I used beef stock today but I have used chicken stock when I've made it in the past and it is good too.  The meatballs will add their own flavor to the stock)
  • 1/2 cup of tomato sauce
  • 2 large carrots, diced
  • 1 large leafy stalk of celery, diced
  • 1/2 pound of green beans cut into 1 inch pieces (I prefer green beans but tonight I didn't have green beans so I substituted one can of black beans.  Use whatever you have on hand.)
  • 1/3 cup of white rice
  • 1 pound of ground beef
  • 1/4 cup fresh mint leaves (you can use a couple teaspoons of dried mint if you don't have fresh.  You can also use cilantro if  you prefer it).
  • 1/4 cup chopped parsley
  • 1 raw egg
  • 1 1/2 teaspoons salt
  • 1/4 teaspoon freshly ground black pepper
  • a dash of cayenne (optional)
  • 1 1/2 cups of frozen or fresh peas
  • 1 teaspoon of dried oregano, crumbles
  • salt and pepper to taste
  • 1/2 cup chopped fresh cilantro to garnish
Directions:
  1. Heat the oil in a large soup pot over medium heat.  Add onion and cook until tender (about 5 minutes).  Add the garlic and cook a minute more.  Add the broth and tomato sauce.  Bring to a boil and then reduce the heat to a simmer.  Add the carrots, celery and beans.
  2. Prepare the meatballs:  Mix the rice into the meat, addition the mint leaves and parsley, salt and pepper.  Mix in the raw egg and form into 1-inch meatballs.
  3. Add the meatballs to the simmering soup, one at a time.  Cover and let simmer for 1/2 hour.  Add the peas towards the end of the 1/2 hour so as not to over cook.  Add a few pinches of oregano and sprinkle with salt and pepper, and a dash of cayenne if desired.
  4. Garnish with Chopped fresh cilantro and serve.
Yields 6 - 8 servings.  Left over soup freezes well.


Like so many others, we are gearing up for tomorrow's predicted snowstorm.  They say we should get about 12" of the white stuff with a lot of blowing and drifting.  I'll be glad to have leftover Albondigas to warm us over the day or two.

Until next time,
Cheers!

Jennifer


Follow my blog with Bloglovin


Some of my favorite Blog Parties I enjoy attending:
 
The Dedicated House Make It Pretty MondayWonderful Wednesday Blog Hop Pure Grace Farm,   Worthwhile Wednesdays, Wake Up Wednesdays, Clever Chicks Blog Hop, FoodySchmoody Tuesday Tastings,  Delish Dessert Link Party, Share your stuff Tuesdays, Anyonita Nibbles Tasty Tuesday'sShare it One More Time, Much Ado About MondayFeathered Nest Fridays, DIY Vintage Chic FridayThe Style Sisters Centerpiece Wednesday, Sew-Off Saturday Sew Can She , Two Cup Tuesday , Shabby Art Boutique Shabbilicious Friday , Give Me The Goods Monday , Homestead Barn Hop , Whimsy Wednesday , Knick Of Time ,  From the Farm Blog Hop , A Peek Into My Paradise , A Delightsome Life , Share your Cup Thursday Have a Daily Cup, Homework , Green Willow Pond , A Stroll Thru Life , Work It Wednesday , Savvy Southern Style , I Should Be Mopping the Floors , Common Ground Be Inspired , Simple and Sweet Fridays Sweet and Savory Sunday This Gal Cooks Marvelous Mondays , This Silly Girl's Life, Living Better Together TGIF Linkparty , DIY Sunday Showcase , Dear Creatives Inspiration, Super Saturday Link Party

Thursday, January 29, 2015

Valentine Themed Kitchen Linens


I belong to a very fun sewing group on Facebook called the SEWcialites.  Each month there is a themed swap in which you are assigned a secret partner and you make a little something for your partner following the theme.  In December the theme was PIN CUSHIONS. 

This month the theme is St. Valentine's Day.  We can make anything we'd like as long as it has a Valentine's Day theme to it.  I chose to make my secret partner a pair of pot holders and coordinating tea towel.  Of course Valentine's Day wouldn't be complete without chocolate too so I'm enclosing a little bag of chocolate treats too.

I had just one fat quarter of the Michael Miller Lovebirds print in my stash and a wee bit of the polka dot print.  I thought they looked cute together so I added some lace and buttons and ribbon and created this Valentine kitchen linen set.  I hope she'll like it.

Until next time,
 
Cheers!
 
Jennifer

Monday, January 26, 2015

Homemade Bird Suet


One of many things that I've loved since moving to my little farm is watching birds!  Where we used to live I rarely had the chance to observe so many species of wildlife and especially the feathered friends variety.


My bird feeders are hanging just outside my kitchen window.  Since I don't have a dishwasher, I've discovered that there is a lot of entertainment to be had just watching birds while I go about my daily chore of washing dishes.  It is hard for me to admit this but...I actually look forward to washing dishes...just because there is a wonderful feathered show in store for me.


Just as many of you have had, we've had some very frigid temperatures lately. The birds NEED extra fat and protein to carry them through the winter. I feel fortunate to be able to enjoy watching the birds and feeding them and I think it is my responsibility, once I began the feeding the birds, to be sure that they continue to have sustenance available at my feeders through the winter months.

 
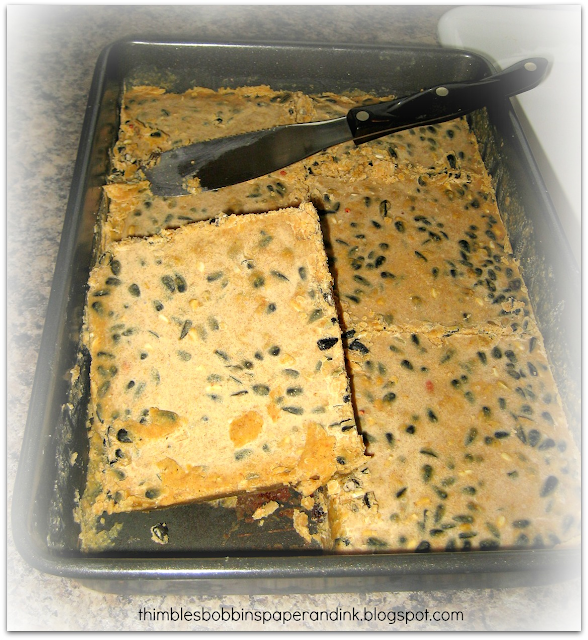
"MY" birds love suet blocks and go through the suet blocks every week.  Last week I decided to see if I could make my own suet and happily discovered that it is very simple to make.  So the next step was to see if my homemade suet was to my feathered friends liking.  I'm delighted to say, YES!  They seem to love it.
 
Here is my recipe for homemade Suet:
 
 
Homemade Wild Bird Suet
 
Ingredients:
  • 2 cups lard
  • 2 cups peanut butter
  • 2 cups quick cooking oats
  • 1 1/2 cups cornmeal
  • 1 cup whole wheat flour
  • 1 cup birdseed
  • 1/2 cup raisins
Directions:
  1. Melt lard and peanut butter in a large pan.  Once melted combine the remaining ingredients and stir well.
  2. Pour mixture into a 13" X 9" pan and allow to cool.  I set mine in the freezer for an hour or two.  It's perfectly fine to put the pan into the refrigerator too..
  3. When the suet has cool cut into blocks to fit your suet feeder.  

  4. If you don't have a suet feeder that uses blocks don't worry!  Once your suet has cooled enough to handle, form into ball and place inside mesh bags that you get oranges/apples/onion in and hang them from nearby trees.
 
 
I would be remiss if not to add that store bought Suet is cheap!   I will also admit that probably my recipe costs a bit more per suet block than the ones you can buy ready made.  That being said, I enjoy the satisfaction of making the suet myself for my bird friends. 
 
Feel free to vary this recipe to your heart's content.  I think next time I'll reduce the amount of peanut butter.  I will probably add more cornmeal and perhaps  add peanuts.
 
What is most important is to have a high fat source of energy for the birds in the wintertime.  They need the fat.  You can also save and use bacon, beef and pork fat.  Bacon fat is fine but use it sparingly since it also contains nitrates and chemicals that the bird don't need in great quantities. 


Until next time,
Cheers!

Jennifer


Follow my blog with Bloglovin


Some of my favorite Blog Parties I enjoy attending:
 
The Dedicated House Make It Pretty MondayWonderful Wednesday Blog Hop Pure Grace Farm,   Worthwhile Wednesdays, Wake Up Wednesdays, Clever Chicks Blog Hop, FoodySchmoody Tuesday Tastings,  Delish Dessert Link Party, Share your stuff Tuesdays, Anyonita Nibbles Tasty Tuesday'sShare it One More Time, Much Ado About MondayFeathered Nest Fridays, DIY Vintage Chic FridayThe Style Sisters Centerpiece Wednesday, Sew-Off Saturday Sew Can She , Two Cup Tuesday , Shabby Art Boutique Shabbilicious Friday , Give Me The Goods Monday , Homestead Barn Hop , Whimsy Wednesday , Knick Of Time ,  From the Farm Blog Hop , A Peek Into My Paradise , A Delightsome Life , Share your Cup Thursday Have a Daily Cup, Homework , Green Willow Pond , A Stroll Thru Life , Work It Wednesday , Savvy Southern Style , I Should Be Mopping the Floors , Common Ground Be Inspired , Simple and Sweet Fridays Sweet and Savory Sunday This Gal Cooks Marvelous Mondays , This Silly Girl's Life, Living Better Together TGIF Linkparty , DIY Sunday Showcase , Dear Creatives Inspiration, Super Saturday Link Party

Sunday, January 25, 2015

Apple - Cranberry Pie


It's no secret that The Mister's favorite dessert is PIE!  Specifically, APPLE PIE!  I haven't baked his much desired pie in quite a while and feeling a bit inspired today I decided to change up his traditional apple pie by adding fresh cranberries.  While looking through my cabinets to see what I might have on hand to pack a little more WOW punch into his apple cranberry pie, I found a bag of dried blueberry infused cranberry/raisins.  Hmmm...now the wheels are turning.  Why not soak the raisins in something...like rum or brandy?  I don't have any rum or brandy but I do have rum extract/flavoring.  And oh look...I have a big and beautiful fresh lemon!  So I grabbed 6 apples and the lemon from the refrigerator, pulled a bag of frozen/fresh cranberries from the freezer, took the raisins and flavorings from the cabinet and then headed to the spice rack for some cinnamon, nutmeg and ground cardamom.  Let's start baking!


Apple - Cranberry Pie
Ingredients:
2 1/2 cups all-purpose flour
1 Tablespoon sugar
3/4 teaspoon salt
1/2 cup cold unsalted butter, cubed
1/2 cup cold shortening
5 to 7 tablespoons ice water
Pie Filling:
1/2 cup raisins (I used blueberry infused dried cranberries)
2 tablespoons of rum extract (or real rum if you have it).  Water may also be used
1 cup of fresh or frozen cranberries (divided)
3/4 cup sugar (divided)
6 medium apples
2 tablespoons quick cooking tapioca
1 tablespoon fresh lemon juice
2 teaspoons grated lemon peel (zest)
1/2 teaspoon ground cinnamon
1/4 teaspoon freshly ground nutmeg
Glaze for the top crust:
2 teaspoons sugar
dash of ground cinnamon
dash of freshly grated nutmeg
dash of ground cardamom
1 egg
1 tablespoon cream
Directions:
  1. In a small bowl, mix the flour, sugar and salt.  Cut in the COLD butter and shortening until crumbly.  If mixing in a food processor, pulse just a few times.  Gradually add water, tossing with a fork just until the dough holds together when you pinch it in your fingers.  (If mixing in a food processor you'll only need to pulse it 6 or 7 times.)  Divide the dough in half and shape each half into a flattened circle shape and wrap them separately in plastic wrap and refrigerate for at least 30 minutes (or overnight).
  2. In a small bowl combine the raisins and rum and let them soak together for about 20 minutes.
  3. Place 3/4 cup cranberries and 1/4 cup sugar in a flood processor and pulse until the cranberries are rough chopped.  Transfer the chopped cranberries/sugar mixture to a large bowl.  Add the apples, the rum soaked raisins, tapioca, lemon juice, lemon zest, cinnamon, nutmeg and the remaining1/2 cup of sugar.  Stir to combine all ingredients together.  Let the filling mixture stand for 15 minutes.
  4. On a lightly floured surface roll out half of the dough (one of the flattened dough rounds) into a 1/8th inch thick circle and transfer it to a 9 inch pie pan.  Trim the pastry to at least 1/2 inch beyond the rim of the plate to allow for crimping later.  Spoon in the filling mixture onto you pie pastry lined pie plate.
  5. Roll the remaining dough to 1/8th inch thick circle and cut into approximately 1/2 inch wide strips.  Create a lattice pattern by weaving the pie pastry dough strips like a basket weave..  Trim and seal the strips to the edge of the bottom pastry and then flute or crimp the edges.  With the remaining 1/4 cup of fresh cranberries, place the berries into the openings between the lattice strips.
  6. FOR THE GLAZE:  in a small bowl mix the sugar, cinnamon, nutmeg and cardamom and set aside.  In a separate bowl whisk the egg and cream and brush over the lattice top.  Sprinkle the sugar/cinnamon/spice mixture over the top of the of the egg/cream washed lattice.
  7. Bake on the lowest oven rack at 400 degrees F for 25 minutes.  After 25 minutes reduce the temperature to 325 degrees F and bake for another 40 - 45 minutes until the crust is golden brown and the filling is bubbling.
  8. Cool for at least 30 minutes.  If is delicious served warm with a small ball of vanilla ice cream.
Recipe adapted from Taste of Home


This is most definitely NOT your traditional apple pie.  It is packed with flavors.  The contrast of the sweet apple, zingy cranberries, tart lemon and spiced with cinnamon, nutmeg and a hint of cardamom make this pie unforgettably flavorful. 

Until next time,
Cheers!

Jennifer


Follow my blog with Bloglovin


Some of my favorite Blog Parties I enjoy attending:
 
The Dedicated House Make It Pretty MondayWonderful Wednesday Blog Hop Pure Grace Farm,   Worthwhile Wednesdays, Wake Up Wednesdays, Clever Chicks Blog Hop, FoodySchmoody Tuesday Tastings,  Delish Dessert Link Party, Share your stuff Tuesdays, Anyonita Nibbles Tasty Tuesday'sShare it One More Time, Much Ado About MondayFeathered Nest Fridays, DIY Vintage Chic FridayThe Style Sisters Centerpiece Wednesday, Sew-Off Saturday Sew Can She , Two Cup Tuesday , Shabby Art Boutique Shabbilicious Friday , Give Me The Goods Monday , Homestead Barn Hop , Whimsy Wednesday , Knick Of Time ,  From the Farm Blog Hop , A Peek Into My Paradise , A Delightsome Life , Share your Cup Thursday Have a Daily Cup, Homework , Green Willow Pond , A Stroll Thru Life , Work It Wednesday , Savvy Southern Style , I Should Be Mopping the Floors , Common Ground Be Inspired , Simple and Sweet Fridays Sweet and Savory Sunday This Gal Cooks Marvelous Mondays , This Silly Girl's Life, Living Better Together TGIF Linkparty , DIY Sunday Showcase , Dear Creatives Inspiration, Super Saturday Link Party

Saturday, January 24, 2015

Chicken Tortellini Soup

In our old age the Mister and I have settled into routines. One of those routines is soup on Saturday nights.  This is especially true in winter months.   Nothing tastes better or is more filling than a nice hot bowl of soup.  I keep it varied each week and make old favorites and try some new soup recipes too.  I decided to write down all of the various soups I make each week here on my blog with, beginning today, a Saturday feature I'll title "SOUP'S ON Saturday".

SOUP'S ON Saturday #1 is Chicken, Spinach and Tortellini Soup.


There are a million and one recipes for Chicken, Spinach and Tortellini Soup and nearly as many names it is known by.  My recipe is certainly not unique.  But this is how I make it.  It is very fast to throw together, has a wonderful rich broth, the cheese tortellini adds just the right amount of stick-to-your-ribs hardiness and, well...we just love it!

Chicken, Spinach and Tortellini Soup

Ingredients:
olive oil (a glug or two...translation: a couple tablespoons)
half an onion, diced
1 clove garlic
1 quart of chicken broth (more if you like more broth in your soup)
2 extra large chicken breasts or 4 small chicken breasts, cut into bite sized pieces
1 (9 ounce) package of fresh tortellini
4 large mushrooms, sliced
Fresh Spinach (I throw about 2 or 3 VERY LARGE HANDFULS of fresh spinach into the pot)
salt and pepper to your preferences
1/4 freshly grated Parmesan sprinkled over the top when serving

Directions:
  1. Glug a couple of glugs of olive oil into the soup pot (probably about two tablespoons worth).  Add the diced onions and saute slowly until the onions are clear. 
  2. When the onions are clear now it is time to add the garlic and saute for about one minute.
  3. Pour the chicken broth into the soup pot with the garlic and onions.  Add the chicken and bring to a simmer.  Simmer the chicken for about 35 minutes or until the chicken is fully cooked.
  4. Now add the sliced mushrooms, tortellini and fresh spinach to the pot and simmer until the tortellini is al dente and the spinach is fully wilted.  Add more chicken broth if necessary. Add salt and pepper to suite your taste.
  5. To serve, grate Parmesan over each bowl of soup and enjoy.

NOTE:  if you have left over rotisserie chicken or turkey that you want to use up, just shred up about 2 or 3 cups of the left over cooked meat and use it instead of fresh chicken.  You won't have to simmer the soup as long if using already cooked meat.

So there is SOUP'S ON SATURDAY #1.  Check back next Saturday to see what's in the soup pot.

It's cold and snowy here on our little homestead.  The soup is going to taste mighty fine tonight!


Until next time,
Cheers!
 
Jennifer


Follow my blog with Bloglovin


Some of my favorite Blog Parties I enjoy attending:
 
The Dedicated House Make It Pretty MondayWonderful Wednesday Blog Hop Pure Grace Farm,   Worthwhile Wednesdays, Wake Up Wednesdays, Clever Chicks Blog Hop, FoodySchmoody Tuesday Tastings,  Delish Dessert Link Party, Share your stuff Tuesdays, Anyonita Nibbles Tasty Tuesday'sShare it One More Time, Much Ado About MondayFeathered Nest Fridays, DIY Vintage Chic FridayThe Style Sisters Centerpiece Wednesday, Sew-Off Saturday Sew Can She , Two Cup Tuesday , Shabby Art Boutique Shabbilicious Friday , Give Me The Goods Monday , Homestead Barn Hop , Whimsy Wednesday , Knick Of Time ,  From the Farm Blog Hop , A Peek Into My Paradise , A Delightsome Life , Share your Cup Thursday Have a Daily Cup, Homework , Green Willow Pond , A Stroll Thru Life , Work It Wednesday , Savvy Southern Style , I Should Be Mopping the Floors , Common Ground Be Inspired , Simple and Sweet Fridays Sweet and Savory Sunday This Gal Cooks Marvelous Mondays , This Silly Girl's Life, Living Better Together TGIF Linkparty , DIY Sunday Showcase , Dear Creatives Inspiration, Super Saturday Link Party

Thursday, January 1, 2015

A new year and a new chapter

Happy New Year!
 
It is not only a new year but it is a new chapter in the Mister's and my life.  Around the first of November I officially moved in to my little house in the country.  We bought a 104 year old farm house that is situated on 5 acres in North Central Indiana.  I'm "back home again in Indiana." 


I have a sweet little barn with two stalls for my horses with a lovely fenced pasture.  In the barn there is plenty of space to add another stall, chicken coup or any number of additional uses.


Behind the barn is a forested area with great trails that we and the dogs are enjoying exploring.  I will have plenty of space for vegetable and flower gardens.  And do you see the little white structure in front of the barn.  You guessed it.  It is an outhouse.  The Mister insists we will NOT refurbish it to working conditions since we have two perfectly functional INDOOR bathrooms.  I find it quaint and hey...you never know when you might need it in an emergency, eh?  Well, he and I will continue to debate the outhouse renovation.  In the meantime it is serving as a garden shed.
 
I love, love, LOVE living in the country.  It is so peaceful and quiet without city noises.  And without city lights the nights are so dark!  Everyday I make new discoveries.  Having never lived on a farm  (small as this one might be) nor have I ever lived in the country, each day I have a new adventure.
 
I am just now (today) unpacking the remaining boxes of my sewing machine, fabric and supplies as well as my paper crafting supplies.  I'm converting the basement into my crafting and sewing room.  Once I'm all set up again I'll be back into crafting and sewing. 
 
Spring will bring the real discoveries of country living.  The horses will be moved her then.  Currently they are being well cared for in Canada.  I can hardly wait for them to get here.  It will be a lot of work for this old gal but I'm eager to jump in with both muck booted feet.  The garden will have to be tilled and ready for planting.  I really want to add some chickens and ducks in the spring as well.  So as you can tell, we are slowly making the transition and reading, studying and learning about what it takes to live on a farm.
 
Thank you for stopping by.  It has taken me a while to unpack and settle so I've not blogged in several months.  I'm eager to share our adventures with you.
 
I wish you and yours all of the best in 2015.  For the Mister and myself, it is going to be an exciting year!  We just know it!
 
Until next time,
Cheers!
 
Jennifer