Tuesday, February 26, 2013

My afternoon at Le Cordon Bleu


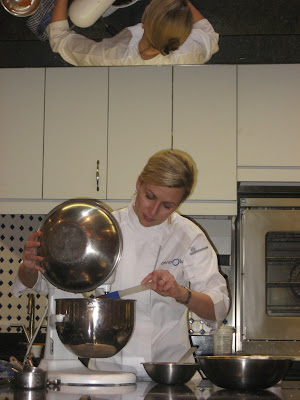
This past weekend I had the opportunity to take a short course/demonstration class at Le Cordon Bleu in Ottawa.  Anna Olson, my favorite Food Network Chef, was there to teach a class on Warm Winter Desserts.  I just could not pass up this unique opportunity to attend a class at Le Cordon Bleu and especially with a chef I admire so much!

I arrived at Le Cordon Bleu a little early and drank in the beauty of not only the building, but the interior restaurant, classrooms/kitchens and just the excitement and awe of being inside this world renowned culinary institution. 

 
Chef Anna Olson is as personable and down to earth as she is on television.  Since I watch her show regularly I felt like I was spending an afternoon with my longtime friend.  Anna and the chef of the Ottawa Le Cordon Bleu school as well as four student chefs were in the classroom/kitchen setting up and greeting us, their afternoon students, as we arrived.  Anna warned us there would be a test at the end of her class..........a taste test! 

 
Anna prepared three different desserts in the short timeframe of the course, all the while answering questions on a variety of culinary topics.  I took notes as fast as my pudgy fingers could write. 
 
While she prepared the desserts, chemestry and technique were key points of her presentation.  In a culinary classroom you are not presented with a "...add 2 cups of flour and 1 cup of sugar" type of education.  We explored the whys and hows and wherefores of the chemical reactions with not only the ingredients, but also the types of utensils (such as baking pans or sheets) you use.  In addition, how flavors develop or, how to develop flavors more prominently depending upon the foods you are preparing were discussed.
 

Being able to watch above in the overhead mirrors as well as straight on allowed the class to actually see the incorporation of ingredients as the correct blending and texture took place.

 
We discussed and learned so much!  I just can't begin to describe how fascinating the course was!  My head was practically spinning by the end with all I was taking in.  Do you know:
  • the differences in flours, (even in "all purpose"), the makeup of the types of flours, winter or summer wheat
  • what DOES the egg yolk do, the egg white, the combination of both and when to use one or the other, or both.  The makeup and weight of the egg and how to substitute for those who cannot eat egg without changing the flavor and texture of your food?
  • differences in (for example) pie plates.  When do you use (with best results) a glass plate, metal plate or a beautiful ceramic pie dish and why it does make a difference.
  • baking powder, baking soda, when to use one, the other or both as well as types of levening agents and how they work
  • starches in cooking and baking, especially for those on gluten free diets
  • saving what might have been a baking disaster
  • creating barriers in pastries so the fillings will not soak through and cause soggy crusts
  • all vanilla is not the same and the about varieties
  • creating a divine Choux paste (Anna is piping a choux paste for crullers in the above photo)

When the class was over, the chefs presented us with a champaign and hors d'œuvre meet and greet and photo opportunity.  In addition to the champaign and hors d'œuvre, we also enjoyed each of the three desserts that Anna had created in front our eyes.  Oh my...we were on a chocolate high by the end of the afternoon.  And the hors d'œuvre that the students of Le Cordon Bleu had created were beautifully presented and tasted devine.  Such a variety of unique creations.  Have you been watching the new cooking show "The Taste"?  Well, that is how these were presented to us. 


In addition to all of the actual culinary discussions, Anna also kept us in stitches and fascinated about the behind the scenes information with regard to what goes into a television cooking show, how it is filmed, hysterical anecdotes that you don't always see on your tv set.

 
I wasn't sure if we could take photos when I left for the class so I didn't take my "good" camera with me.  I did remember to tuck my little pocket Elph camera in my purse "just in case."  As it turned out, taking photographs was welcomed, so we all snapped away.  Sadly, my photos didn't turn out as well as I wish they had.  I'm sharing the best of what I could salvage.  The photo (above) is one of three incredibly amazing and gravity defying sugar creations that students at Le Cordon Bleu had created.  I am sorry you cannot see the detail of this sculpture.  It is amazing. 
 

And what's a delightful afternoon out and about without a little shopping, eh?  Yes, there was a Le Cordon Bleu Boutique.  You KNOW I couldn't leave the institute without picking out a few souvenirs from my day.  One item I purchased that isn't pictured is a silicon baking mat.  I'm eager to try it out.  Perhaps I'll make The Mister some cookies this afternoon.  


All too soon it was time to leave a most memorable afternoon and experience.  I took away so much information from this course and had so much fun too.  As you can see from the photo, Le Cordon Bleu has a restaurant inside the school too.  One day I hope the Mister and I can get reservations to eat there. 
 
Le Cordon Bleu has a fascinating history and is now located in countries all over the globe.  In addition to the main full time courses of study, they do offer short courses spanning anywhere from one to three to seven full day courses as well as the 2 hour demonstration courses.  If you live in an area where a Le Cordon Bleu school is located (the Ottawa Le Cordon Bleu is the only one located in all of Canada) I would encourage you to check out what is available.  I was chatting with a woman who told me that in a couple weeks she will be taking her 8 year old son to a special children's course that is being offered during spring break.  What an awesome opportunity for young children!
 
I will most definitely be making The Mister one of the desserts that Anna Olson prepared for us.  Perhaps you'll see it here on my blog next weekend for what's under the cake dome Sunday.
 
Until next time,
Cheers!
 
Jennifer

Monday, February 25, 2013

Loss of furry friends


This weekend I made two more sympathy cards for the loss of a beloved furry companion.  As a card maker I thoroughly enjoy being asked to make a card for occasions of any kind.  And I am touched that people ask me to make something to send for them.  Sympathy cards, however, are the hardest of all occasion cards to make.


 Both dogs lived long lives, but in the end were taken by cancer.  I decided to make the cards essentially the same layout.  The differences are the designer papers and the sentiment on the front that I used.  The inside sentiments are the same.


Card Recipe:
Stamps:  Paw print on the outside by Inkadinkadoo.  Sentiments by Papertrey Ink"With Sympathy: Loss of pet"
Designer Papers:  K & Company
Ink:  Versamark and black detail embossing powder and Momento Tuxedo Black
Accessories and Embellishments: Nestibilities flower die and Nestibilities rectangle and scalloped rectangle dies, craft felt, Martha Stewart rose leaf punch, prestamped pawprint cotton twill tape.

 
Until next time,
Cheers!

Jennifer


Wednesday, February 13, 2013

Beaded Bracelets and Earrings

Yesterday I posted several beaded Shepherd Hook Bookmarks that I've made and put in my shop.  I've been bitten by the "beading bug" and proceeded to make some bracelets with matching earrings.

These are really fun to wear for a more casual look. 

The beads in the earrings match the bracelets.
If have seen my Shepherd Hook bookmarks, you probably recognize some of the same mineral beads and silver etched spacer beads as in the bracelets and earrings.

I tend to make what appeals to my more casual life and to what I enjoy.


I made this green/orange multi-mineral bead and silver etched beads bracelet in a similar style for myself and wear it practically everyday in combination with my ever present silver bangle bracelet.  They just seem to go together so well.
 

I love these feather charms.  I just do.
If you'd like any of the above bracelets and/or earrings they are all available at my ETSY SHOP.
Thanks for looking!
Until next time,
Cheers!
Jennifer


Shared on:

Tuesday, February 12, 2013

Beaded Shepherd's Hook Bookmarks


This comic has been making the rounds on Facebook and Pinterest and it gave me a big chuckle.  Yes, I love the ability to carry my library in my hand with my Ipad, but I also love books.  You remember books...made of paper and binding and the tactile connection between the author's written word and your imagination.
 
How do you mark your place in your books?  A scrap of paper, a dog earred corner?  A piece of tissue?
 
I've been having the best time making these bedazzled Silverplated, Shepherd's Hook Bookmarks.  They are like jewelry to mark the place in your made-of-paper books.

 
These markers will not damage your book.

 
They are eye candy for the Bibliophile.


Perhaps you have a bibliophile in your life who might enjoy a Beaded Shepherd's Hook Bookmark.  These three are handmade by ME are now available in my shop!
 
Until next time,
Cheers!
 
Jennifer


Shared on:


Monday, February 11, 2013

A rainbow of colors of Crocheted Hair Bows for little girls


Several weeks ago I posted about learning to crochet and making these darling little girl's  hair bows.  They are so much fun to make that I couldn't stop myself.


I found lovely rainbow colored skeins of yarn and set out crocheting, and crocheting and crocheting......

 
And finally, I packaged them up and put them up for sale at my shop.  If you have a little girl in your life who loves to wear hairbows, you might want to check these out HERE.
 
Each bow is handmade, crocheted and has a satin ribbon rose in the center and attached to an alligator clip.  Every one of them is made with love by me!  :)
 
The original hairbow pattern design is by Craftiness Is Not Optional   
 
Until next time,
Cheers,
 
 Jennifer


Shared on:

Sunday, February 10, 2013

Cake dome Sunday #12: Gingerbread layer Cake with Raspberries and Lemon Buttercream Frosting


One of my favorite celebrity chefs is Anna Olson.  I watch her cooking show on television whenever I can.  She takes her baked goods and pastries from good to extraordinary to spectacular.  This past week on her program she showed how to make gingerbread cookies.  From there she made
 gingerbread and then finally made this Elegant Gingerbread Layer Cake with Raspberries and Lemon Buttercream Frosting.  I knew immediately that I had to give her recipe a try for the Mister this weekend.

  
The flavor of this cake truly is extraordinarily delicious.  Fresh grated ginger, fresh grated lemon peel and lemon juice, spiced with cinnamon, nutmeg, allspice, clove and sweetened with fancy molasses and brown sugar and an extra pizzazz added of ginger ale (or ginger beer) in the batter: all of these ingredients combined to make a light and very flavorfully fresh gingerbread cake.
 
 
To make this high and mighty cake you need to use three 8" round cake pans.  I have two round ones but not three.  As I tore through my cupboard searching for cake pans I discovered waaaaaaaaaay in the back of the bottom cupboard three heart shaped cake pans.  PERFECT!!  Valentine's day is this week and the Mister is going to get his sweet Valentine treat from me in the form of this cake.

  
This cake is so good!  It is light in texture and bold in flavor.  I know you won't be disappointed if you make it.
 
Here is the recipe Courtesy of Anna Olson.
 
Elegant Gingerbread Layer Cake with Raspberries and Lemon Buttercream Frosting
 
Ingredients:
Cake
  • 2/3 cup vegetable oil
  • 1/2 cup granulated sugar
  • 1/2 cup packed dark brown sugar
  • 3 large eggs
  • 3 tablespoons finely grated fresh ginger
  • 2 teaspoons finely grated lemon zest
  • 2 cups all-purpose flour
  • 2 teaspoons baking powder
  • 3/4 teaspoon ground cinnamon
  • 1/4 teaspoon ground cloves
  • 1/4 teaspoon allspice
  • 1/4 teaspoon nutmeg
  • 1/2 cup fancy molasses
  • 1/2 cup maple syrup
  • 1 cup ginger ale (or ginger beer)
  • 2 tablespoons lemon juice
  • 1 teaspoon baking soda
 
Icing and Assembly 
  • 1/4 cup unsalted butter, at room temperature
  • 3 cups icing sugar, sifted
  • 2 teaspoons lemon zest
  • 2 tablespoons lemon juice
  • 2 tablespoons water
  • 1/2 teaspoon vanilla extract
  • 2 cups fresh raspberries
 
Directions:
Cake
  1. Preheat the oven to 350 F.  Grease 3  8 inch round cake pans and line the bottoms with parchment paper.  Dust the sides of the pan with flour, tapping out any excess.
  2. Whisk together the oil, granulated sugar, brown sugar, eggs, giner and zest.
  3. In a separate bowl, sift the flour, baking powder, cinnamon, cloves, allspice and nutmeg.  Add this to the oil mixture and stir until blended.
  4. In another bowl, whisk the molasses, maple syrup, ginger ale (or ginger beer), lemon juice and baking soda (this will froth up).  Add this to the batter and beat vigorously until smooth.  The batter will be very liquidy (fluid).  Pour the batter into the prepared pans and bake for about 30 minutes, or until a tester inserted in the center of the cake comes out clean.  Cool the cakes for 30 minutes in their cake tins, then turn out to cool completely.
Icing and Assembly:
  1. For the icing, beat the butter with half of the icing sugar and the lemon zest.  Add the lemon juice, water and vanilla and beat well.  Add the remaining icing sugar and beat well again, until the icing is fluffy and spreadable.
  2. To assemble, place one cake layer on a platter and spread the top with a third of the icing.  Dot the icing with raspberries and place a second cake layer on top, pressing down gently.  Spread another third of the icing over this layer and dot with raspberries.  Top this with the final cake layer, spread the remaining icing overtop and garnish with the remaining raspberries.  Chill the cake until ready to serve.
  3. The cake will keep, refrigerated for up to 3 days.


Do you have special plans for your sweetheart this Valentine's Day? 
 
Until next time,
Cheers!
 
Jennifer


Shared on:


And

Monday, February 4, 2013

With Sympathy - cards

Sadly, within the last couple of months we've lost some dear people.  Sympathy cards are probably one of the most difficult cards for those of us who make cards to create.


Card Recipe:
Stamps:  Penny Black "Poppies" and sentiment from Anna Griffin/All Night Media
Ink: Momento Tuxedo Black and image colored with copic markers
Design Paper:  Pretty Poppies Mat Stack from Autumn Leaves
Embellishments: Paper doily, Martha Stewart Butterfly Punch, mini pearls, vellum, Stickles glitter.


Until next time,
Cheers!

Jennifer

Sunday, February 3, 2013

Under the cake dome Sunday #11: White Chocolate Raspberry Cheesecake

St. Valentine's Day is just around the corner and so for today's What's under the cake dome Sunday #11 post, I decided to make the Mister a Valentine's Day White Chocolate Raspberry Cheesecake.

 I like to play with my food just as much as the next big kid, so instead of swirling the raspberry sauce to create a marble top effect, I pulled the raspberry sauce into three heart shapes. 

And just so you know a bit about the behind the scenes posts of my Cake dome Sunday desserts, the Mister gets very frustrated with me that he has to wait until I photograph HIS dessert.  It has become a running joke in our house about the time period behind making HIS dessert and HIS actually first bite.  For this cheesecake, he sighed a very loud "MMMMMmmmmmmmmmm" when he finally got his first bite and declared this "Deeeeeeeeelicious!"
 
Let's get started.  First we'll make the chocolate cookie crumb crust.

Just a few simple ingredients.  Combine them in a bowl.

Then press the crumbs in the bottom of a springform pan. 

Now we're ready to make the raspberry filling.  Just four ingredients.

Combine the ingredients for the raspberry filling in a saucepan on the stove.

Bring to a boil and simmer until it thickens.

Now for the cream cheese part.  In a separate bowl combine the ingredients and beat.

Time to melt the white chocolate with some cream in the top of a double boiler.

Mmmmm...from solid squares of white chocolate to creamy, smooth in just a very short time.

Now to combine the white chocolate/cream mixture and vanilla with the cream cheese mixture.

Pour half of the cream cheese mixture over the chocolate cookie crumb crust.

It will look like this.

Now for some yummy, colorful, delicious raspberry filling.  Just spoon on the filling reserving three good sized tablespoons full for the top.  Don't worry that it doesn't cover the cream cheese. 

Now pour the remaining cream cheese over the raspberry center of the cheesecake.

Now we're ready for the reserved raspberry.  You can spoon on three dabs and swirl with a knife for a marbled effect, but since it is almost Valentine's Day I decided to shape the three dabs of raspberry into heart shapes using a wooden skewer stick to "pull" the filling into the heart shape.

Yippee!  It worked!  Not too bad for a first try, if I do say so myself!  Time to pop this cheesecake in the oven to bake.  Then, once baked, you'll have to find another activity to entertain yourself because the cheesecake must chill in the refrigerator for at least 8 hours!  Yep!  It is a long wait but you'll be happy you did.
 
Enjoy!!
 
Here is the recipe:
 
White Chocolate Raspberry Swirl Cheesecake
Ingredients:
1 cup chocolate cookie crumbs
3 tablespoons white sugar
1/4 cup butter, melted 
 
1 package (10 ounces) frozen raspberries
2 tablespoons white sugar
2 teaspoons cornstarch
1/2 cup water
 
2 cups  of white chocolate chips OR 12 squares of baking white chocolate  (either will work)
1/2 cup cream
 
3 (8 ounce) packages of cream cheese that you've allowed to soften to room temperature
1/2 cup white sugar
3 eggs
1 teaspoon vanilla extract
 
Directions:
  1. Mix together the cookie crumbs, 3 Tblsp. sugar and melted butter in a bowl.  Press the mixture into the bottom of a 9 inch springform pan.
  2. Combine the raspberries, 2 Tblsp. sugar, cornstarch and water in a saucepan and bring to a boil.  Continue boiling for 5 minutes or until the sauce becomes thick.  If you do not want raspberry seeds in your cheesecake now is the time to strain through a mesh to remove the seeds.  The seeds don't bother me so I didn't strain them.
  3. Using a double boiler or a metal bowl over a pan of simmering water, melt the white chocolate with the cream, stirring until smooth.  Do not overheat this. 
  4. In a mixing bowl, beat the cream cheese and 1/2 cup of sugar until it is smooth.  Beat in the eggs one at a time.  Now blend in the melted white chocolate/cream mixture and the vanilla.
  5. Pour 1/2 of the cream cheese batter over the crust.  Spoon on all but three heaping tablespoons of the raspberry sauce over the batter.  Pour the remaining cheesecake batter over the raspberry in the pan and then spoon three tablespoons of the reserved raspberry sauce on the top.  You can swirl the raspberry sauce topping to create a marbled effect or shape the dollops into a heartshape.
  6. In a preheated 325 degree F oven (165 degrees C) bake the cheesecake for 55 to 60 minutes, or just until the filling is set.  Cool to room temperature and then cover with plastic wrap and refrigerate for at least 8 hours before removing the cheesecake from the springform pan.  Garnish with raspberries and enjoy!

Until next time,
Cheers!
 
Jennifer