Monday, August 29, 2011

Baked Doughnuts

A month or so ago I bought a doughnut pan. Since then I've been trying out different recipes for baked doughnuts. What a surprise it was when I looked to see what the new House Mouse and Friends Monday challenge is. The challenge is to create a recipe card using any House Mouse and friends stamp. So rather than doing the Monday morning house work I should have been doing, I jumped at the opportunity to ink up this cute doughnut munching House Mouse stamp.
The recipe card went together very quickly. I printed my recipe from the computer. It took me a couple of tries to size and space it correctly so that I could then stamp the House Mouse image in a proper proportion and placement. Next, I colored the image with copic markers, added some clear glossy accents to the frosting and then sprinkled pink and red microbeads on the wet glossy accents. From there it was a simple matter of mounting the recipe on cardstock. I found an old doily that was begging for a purpose so I added it. There was a bit of too much blank space in the upper right corner and so I took that as a sign I needed to use my new Stampin' Up! doily punch. The finishing touch was adding a button and some DMC embroidery floss.

After the recipe card was completed it seemed almost criminal not to give the actual recipe a try, so I whipped up a batch of the baked doughnuts. This recipe is a white cake with cinnamon, nutmeg and clove in the batter. It tastes wonderful! And YES! I ate a couple. Well, you wouldn't want me to recommend a recipe that I hadn't yet tested, would you? They are very tasty! This recipe made two dozen doughnuts so before frosting all of them I am putting a dozen in the freezer to pull out and frost another day.

If you don't have a doughnut pan you can easily bake these in muffin tins.

Until next time,
Cheers!
Jennifer

I'm linking this recipe and post to

Friday, August 26, 2011

You're too kind!


I bought this yarn with the hopes of knitting either a scarf or hat from it. And while I consider myself to be very experienced and knowledgeable about many of the fiber arts, knitting is something I just cannot grasp. My sister, however, is a fabulous knit-wit...oops, I mean knitter! She knits the most beautiful and amazing apparel and artwork, so I asked her if she would knit me something if I sent the yarn.

Hurray! She eagerly agreed to help me out, so today I'm sending her this ball of yarn and am going to let her work her magic! I wanted to include a note and a thank you in the box, so I made her this thank you tag to attach to the yarn.

Card Recipe:
Stamps: Taylored Expressions "Knit wit" set and inside sentiment is Stampin' Up! "Whimsical Words" set
Ink: Brilliance Pearl Jade and Stampin' Up! Chocolate Chip. Image colored with copic markers
Accessories: Nestibilities Dies, DMC thread, safety pin and Sakura Gelly Roll pen

Off to the post office now to mail out the yarn. I'm looking forward to sporting a very pretty hat or scarf from this yarn.

Cheers!
Jennifer

Tuesday, August 23, 2011

An Apple a Day

As summer begins to wind down and a definite crispness is in the air, I'm beginning to see that the signs of autumn are appearing. Fall apples are arriving at the fruit markets and this little happy Hopper bunny has found an entire basket full to enjoy!

The current House Mouse and Friends challenge #102 is to get "Fruity." Scamper on over to the House Mouse and Friends site and join in the challenge using any of your favorite House Mouse, Happy Hopper or Gruffy stamps that involve fruit in any form.


Card Recipe:
Stamps: Stampabilities "An apple a day" Happy Hopper HMLR1047
Ink: Memento Tuxedo Black, Tim Holtz distress ink in Aged Mahogany, Peeled Paint and Antique Linen. Image colored with Copic Markers
Designer Paper: K & Company
Embellishments: Nestibilities Frame Die, Cuttlebug floral embossing folder, Fiskars photo corner punch, Stampin' Up small oval punch, Baker's twine, Glossy Effects dimensional glaze, a button from my stash.


Until next time,
Cheers!

Jennifer


Sunday, August 21, 2011

Home is where the heart lives.

I love, love, LOVE primitive art. In my home nearly every lithograph, print, framed needle work and the decor is primitive art. My favorite artists of this genre include Jane Wooster Scott, Charles Wysocki and Warren Kimble.

This wonderful stamp set is from Cornish Heritage Farms, which sadly is no longer made. The set contains the individual trees, sheep, houses, hills and sentiments. Setting up scenes with this set is so much fun! It does require a lot of masking but is such fun once the scene begins to take shape.

For this card there is not only a lot of masking but also a lot of sponging of ink colors. When I say I'm getting inky today, this card is a prime example. The sheep are done with a product I found in the $1 store years ago and I can no long get. It is this goopy "white snow" product, they called it. It actually almost looks like frosting. Sadly for me, I used it all up on my sheep so I'm all out of it now.

I have a special someone I want to send this card to. She relishes anything primitive too.

Until next time,
Cheers!

Jennifer

Saturday, August 20, 2011

Love, Honor, Cherish

"Darlin'! We need to leave in 15 minutes!" said the Mister. YIKES! I had the shower gift all wrapped up and just knew there was something else I needed to do before this evening. Yep, the gift card...I still hadn't made it. So here is my 15 minute card. It's not fancy but it made up in a jiffy.

Card Recipe:
Stamps: Anna Griffin sentiments (All Night Media)
Ink: Versafine Onyx Black
Designer Paper: Making Memories
Embellishments: Making Memories ribbon (Love, Honor, Cherish), Prima Flowers, Nestibilities Dies, Swiss Dots embossing folder, Pearl centered brad from BRIDES magazine wedding collection, pop dots.


Fast and simple it was. The bridal couple's kitchen gadgets and linens are in a very elegant black and white color scheme so I was happy to have this paper, ribbon and flowers on hand.

I hope you are enjoying a fabulous weekend.
Cheers!

Jennifer

Sunday, August 14, 2011

Hey there, Punkin'! I pick YOU!

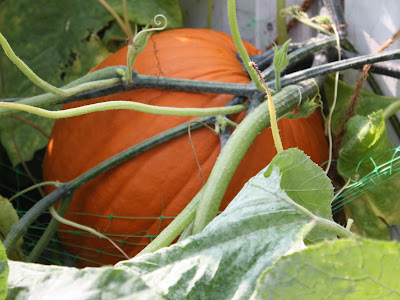
My little pumpkin patch is providing me with 5 (and possibly 6) LARGE and beautiful pumpkins. I've always had a fascination with pumpkins. Love to eat them but I also just think they are such a beautiful squash-like fruit. But now I'm faced with a question: How do you tell when a pumpkin is ripe to pick?
I found my answer and today we cut and harvested our first pumpkin of the year and it is a doozy too!
This is what I've learned about pumpkin "picking":
1.) Color is a good indicator. Chances are if it is orange all the way around, the pumpkin is ripe.
2.) Give them a thump. If it sounds hollow, it is ripe and ready to be picked.
3.) The Skin is hard. Use your fingernail and if the skin dents but doesn't puncture, then it is ready for harvest.
4.) The stem is hard. The stem above the pumpkin starts to turn hard, the pumpkin is ready for picking.
But you cannot "pick" a pumpkin. At least not the same way as you do a tomato or green bean. You'll need to use a sharp knife to harvest your pumpkin.
And when you cut the pumpkin, be sure to leave at least several inches of stem attached to the pumpkin. This will slow down the rotting of the pumpkin.
You'll want to disinfect your pumpkin too. After you harvest your pumpkin, wipe it down with a 10% solution of bleach. This too will help prevent premature rot.
But this is only August and I would like to show off my pumpkin for Halloween. How do I prevent it from rotting before then?

Here's how: Keep your pumpkin out of direct sunlight (I'll keep mine in the basement). If you've followed these steps for properly harvesting your pumpkin you should be able to store the pumpkin for many months until you are ready to use it.

MMmmmm...I think I smell some pumpkin pie, pumpkin soup, pumpkin ice cream, pumpkin desserts, pumpkin muffins and so many other pumpkin-y goodness in the future!

For a good article on Pumpkin harvesting check out this link HERE.

Until next time,
Cheers!

Jennifer

Friday, August 12, 2011

Purple Bean Blossoms

Very early this morning, my faithful dog Spot (aka: Noah) and I went out to the garden to putter about. I took my camera with me because it is such a beautiful morning and I've been wanting to take pictures of the purple bean blossoms.


Do you know why these are Purple Bean Blossoms and not the usual pretty white bean blossoms? Because these are Burgundy beans. AND, they are magical beans! Trust me and follow my story and you'll see what makes them magical.
Aren't they pretty?

And purple bean blossoms means purple beans grow!

This is a white bean blossom (DUH! You can see that, eh?!) White blossoms mean green beans will grow.

See? White blossoms = green beans. Purple blossoms = purple beans. Stay with me now. There is a point to this essay on purple vs. white bean blossoms.

Back in the spring I had planted all of my beans (green beans with white blossoms). They were beginning to come up great. One day, my faithful dog Spot (Noah) and his big brother Ruffus (aka Gabe) decided to do some plowing in my garden. My garden IS fenced but Spot (aka Noah) and Ruffus (aka Gabe) can jump fences with amazing elegance...much like they have a bit of equestrian blood in them. This dog plowing took place over half of my rows of beans and some of my broccoli plants. Consequently, I had to replant and hope they'd still come up. But alas, I could not find one single package of bean seeds ANYWHERE! Seriously, they were all sold out. Sold out, that is, except this one last package of burgundy beans. The package says that they will turn green when they are blanched. HMMmmmmmm, I thought. Sounds like they are trying to sell me Jack and the Beanstalk magic beans. But since I really wanted to replace the damaged plants, I bought this packet of beans and decided to give them a go.

So this morning, after admiring the bean blossoms I realized that FINALLY the beans are coming on the vine and I picked the first handful and took them inside to see if they really are the magical beans the package promised. I washed them and trimmed the ends...

...and then I blanched them for just a minute in boiling water. See the beans going in the water as purple (burgundy) beans?

And suddenly (and I mean SUD-DEN-LY!!!) they turned from purple to green. VOILA! There you go! Just like magic! Green beans!

I plunged them in ice water and then...

...drained them. They are ready to either eat now or freeze for later use.

Isn't this the most amazing story you've read this morning? *snort* *smirk* *wink*

I thought it was awesome.

By the way, did you know that there is a town in Indiana called Bean Blossom? Yes there is! I wonder if they grow magic beans in Bean Blossom, Indiana? I'll have to find out.

Until next time,
Cheers!

Jennifer

Wednesday, August 10, 2011

Dancing Candles

August is a big month for birthdays for my family and friends. (There are 5 birthdays this month! And, ummm, yes! Today is my birthday. :-)
These cards aren't for me, but I hope the recipients will be as excited about their birthdays as the happy, dancing candles seem to be! *smiles*
This is a stamp I've had for years and I always think it makes such a festive birthday card to send to either a man or a woman. The stamp is made by "The Artful Stamper".
It has been a very long time since I've painted with Twinkling H2O's so these were a lot of fun. I stamped with Versamark and embossed with antique gold on watercolor paper. Then I painted with twinkling H2O's. I stamped the image and colored a few images and then cut out random candles and used dimensional foam tape to make some of the candles "pop" right off the page.
The inside sentiment, "The More Candles the bigger the Wish" is from Stampin' Up! and seemed perfect for these inside of these happy dancing candles birthday cards.
Hope you are having a super day!
Until next time,

Jennifer

Tuesday, August 9, 2011

A Stolen Life: A Memoir by Jaycee Lee Dugard

A Stolen Life: A MemoirA Stolen Life: A Memoir by Jaycee Lee Dugard

My rating: 5 of 5 stars


I have to give Jaycee Lee Dugard 5 stars for the courage to write down and share the incomprehensible horrors she endured for 18 years. This isn't a book one can judge by way of writing style, story line or any of the usual ways we rate a book.


A Stolen Life: A Memoir is not for the faint of heart. Jaycee Dugard's life during her 18 years of captivity, her journal entries, and her reflections are honest and straightforward.


What one is left with after reading Jaycee's memoir is that of hope, strength and the power of love.


View all my reviews

Sunday, August 7, 2011

Cinnamon-sugar topped Muffnuts

Yes, you read that right. Muffnuts! The name is the Mister's idea and here's the story about these yummy breakfast or coffee break treats. I love donuts. I especially love cake donuts but I don't have a deep frier anymore. But recently I discovered a donut baking sheet/pan and had to have it. YES! HAD TO!
The thing is, even cake donuts are usually fried, so I began a search for baked donuts. But you are still wondering what a Muffnut is, right? Well, this morning I made my first batch of baked donuts. I mixed the batter and put it in my donut baking pan and popped them in the oven to bake.

Fifteen minutes later I turned them out on a tea towel to cool.

But before they got completely cool I brushed them with butter and dipped the tops in cinnamon sugar.

LOOKIE!! A dozen baked cinnamon-sugar topped donuts.

Are you drooling yet?

So when I fixed the mister's plate for breakfast I added a freshly baked cinnamon muffnut to his plate. Am I not just the trophy wife? *snort!*

Now, back to the term Muffnuts. Well, these baked donuts are delicious. TRULY THEY ARE! But they actually are more the texture of a muffin and not quite as dense as cake. So the mister said, "These are really good but I think they are more muffnuts (muffin/donuts) rather than donuts." Hence, the term muffnuts was coined and labeled to my new creation.

You can make these in mini-muffin tins if you would like tiny muffins more along the lines of donut holes (sort of).

Here is the recipe for you:

BAKED MUFFNUTS
1 1/2 cups all-purpose flour
1/2 cup sugar
2 teaspoons baking powder
1/4 teaspoon salt
1/4 teaspoon nutmeg
1 large egg
1/4 cup milk
1/4 cup melted butter
1/2 teaspoon vanilla

Cinnamon-sugar mix for topping

In a bowl, mix flour, sugar, baking powder, salt and nutmeg.

In another bowl beat egg to blend with milk, butter and vanilla. Add flour mixture to egg mixture and stir just until the flour is blended in and moistened. (Do not over mix).

Spoon into well-greased donut or muffin pans.

Bake in a 350 degree oven until golden brown, approximately 15 minutes.

Turn out baked donuts on cooling racks or tea towel. Brush with melted butter and then roll in cinnamon sugar mixture.

Or, frost with icing in your favorite flavor and top with sprinkles and chopped nuts. Let you imagination lead you.

Next time I'm adding a handful of fresh blueberries to the batter. MMMMmmmmmm!

We have some left over and they are fresh. Come on over and I'll put a fresh pot of coffee on!

Until next time,
Cheers!

Jennifer

I'm linking with:
sew many ways


and with: