Monday, April 25, 2011

Le Poulet Six Pocket Tote Bag

About a year or so ago I saw these wonderful fabrics and knew I had to have them. The fabric is aptly called "Le Poulet" and is by Whistler Studios for Windham fabrics. These yardages also come a deep rusty red shade, too.
I really wasn't sure what I'd be making but I just had to have it! I think in the future I'll be making some kitchen curtains and aprons. I have a small church bench that could use a cushion, pillow or throw over it. Perhaps a small quilt will be made as well.


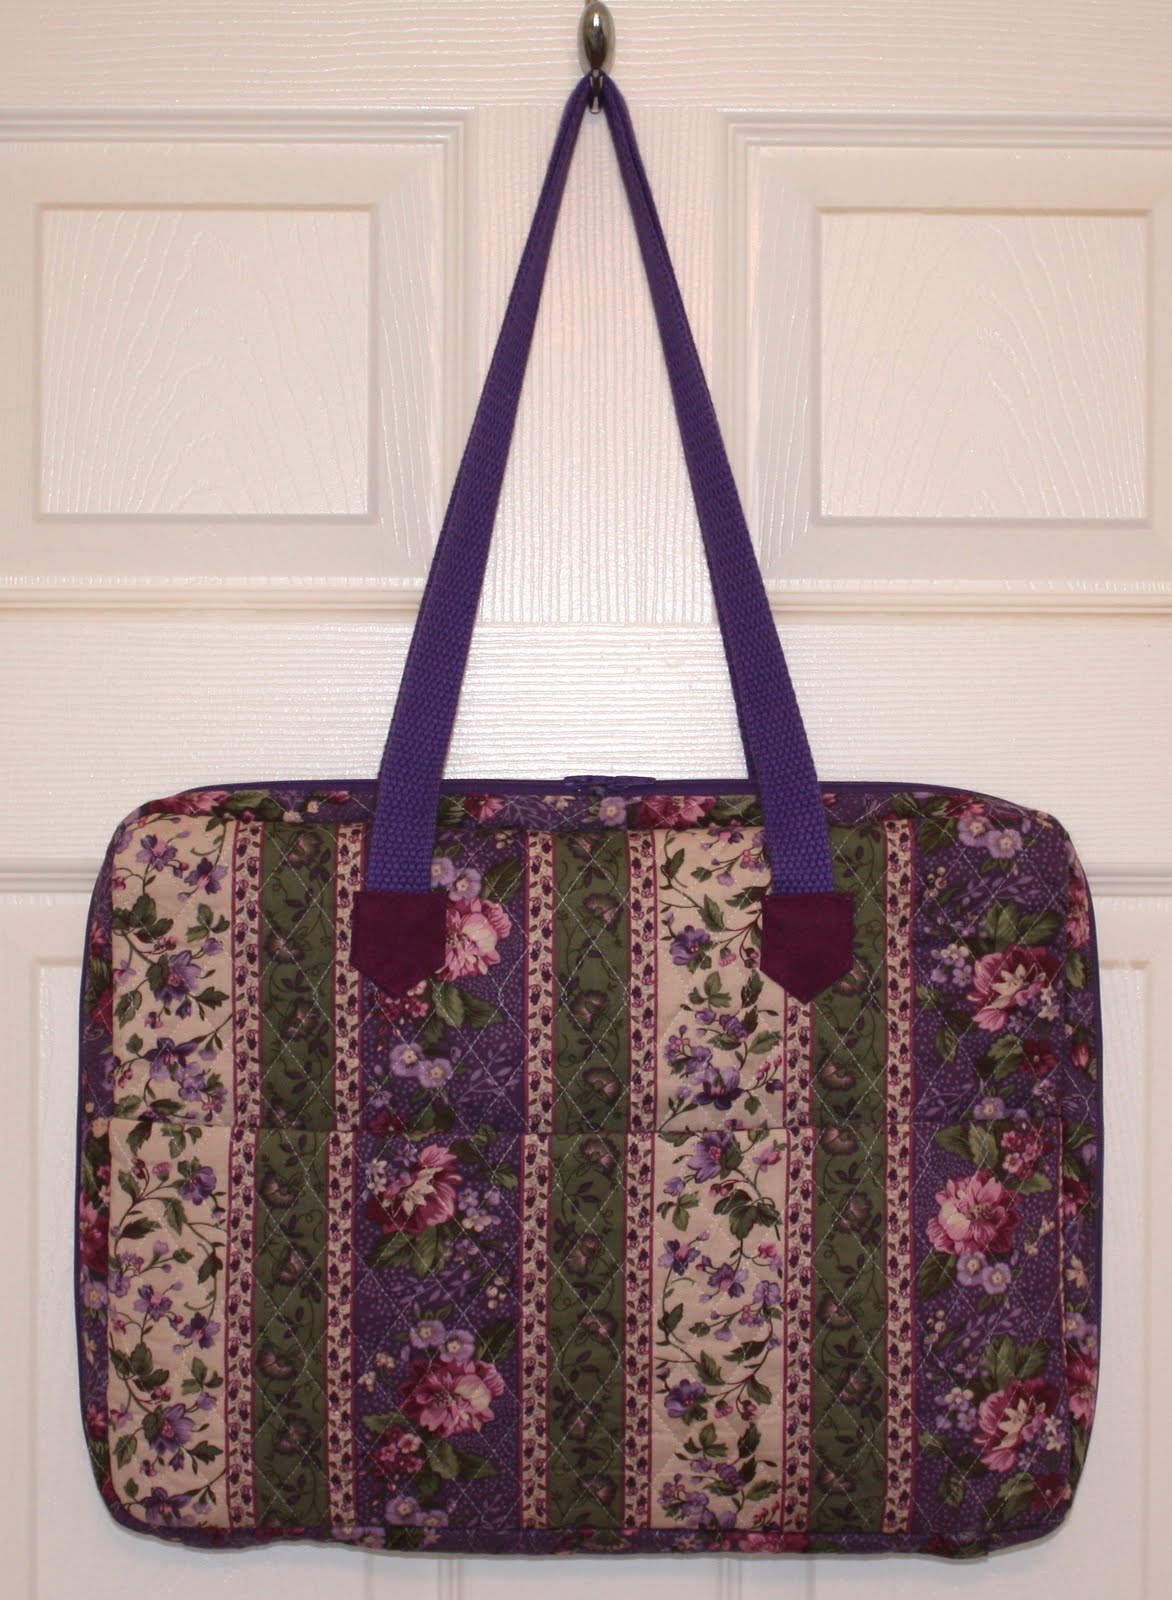
A few weeks ago I came across a 6 pocket totebag. I loved how simple it was to make and the outside cover with the straps divided the outside of the bag with six pockets. Perfect for tossing your cell phone, ipod or notepad into while the inside was not too large but certainly large enough for wallet, keys, tissues and any number of items we must have at hand.


As I usually do with totebags that I make, I included a key clip as well as inside pockets. I just do not like standing at the car digging to the bottom in search of my keys or shopping list when it is so easy to have them right at hand with the inclusion of a couple quick pockets and addition of a key clip.


I found the instructions for this simple 6 pocket tote bag HERE. With a little conversion of the pieces you cut you can make it larger and I think that if I make another one I'll include a magnetic snap at the top.

I'm thinking that maybe something along these lines might make a good gathering tote in the garden out of another fabric or canvas or even for gathering eggs with a few tweeks to the pattern. The original bag is show in gorgeous Amy Butler fabrics but I wanted to keep mine a bit more simple with the "Le Poulet" country theme.

The sun is out today! YIPPEE!! I'm going to spend time today outside in the garden preparing it for planting. It will still be a month until we are past frost and freezing but once the warmth hits we have to take full advantage of each spring day.

Cheers!

Jennifer

Sunday, April 24, 2011

Easter Blessings!

Easter Blessings to you and your family!

Today I'm fondly remembering happy, HAPPY Easter days celebrated when my three children were little. Dressed in their Easter finery we were just getting ready to go to church to celebrate the day (Photo circa 1985).

I hope you are enjoying memories of Easter past and especially creating memories and traditions today!

Hallelujah! The Lord is Risen! HALLELUJAH!

Saturday, April 23, 2011

We're having Carrots for Easter!

Yes! We're having carrots for Easter afterall! Not the edible variety. Today, quite by chance, I happened to stumble upon Clare's blog aptly titled Clare's Craftroom and I discovered these oh-so-sweet fabric carrots to make. Clare was gracious enough to sketch out the pattern and give a tutorial to share. You can view and make your very own fabric carrots by clicking to her instructions HERE.
I had no intention of spending the afternoon making carrots but when I saw Clare's instructions were very sucinct and easy to follow...well, one thing led to another and I found myself looking through my fabrics and fat quarters to see if I had anything to make cute carrots with. I've discovered the my fabric stash is lacking in cute ORANGE fabrics but I did have these on hand so off I went and spent the afternoon whipping up a batch of carrots to use as our table decorations for Easter.

Doesn't it look like the Easter Bunny delivered this basket?

I've posted previously this month the instructions for the plush bunnies (below) and the fabric eggs in the photo provided by more very generous fiber artists who have generously shared their creative talents. What fun it is for me to find these patterns and lovely ideas for holiday decorations online to make. Thank you ladies!

Now I must finish up the Easter preparations that I had intended to do today. My bunny, chick and flower sugar cookies cutouts are baked and I just need to frost and decorate them. I hard boiled a few eggs for the mister and myself to color later this evening.

Easter blessings to each and every one of you!

Jennifer

Friday, April 22, 2011

One yard Easter gifts

A week or so ago I posted photos of the purple and pink rose fabric Peter Cottontail Bunny and eggs (see the post HERE) that I made for a very special little two year old friend of mine. **smiles** I really love the fabric and only had one yard of it to play with. The stuffed bunny and eggs only required 1/2 of a yard and I just had to use the rest of the piece for something special. I decided to make a little smocked sundress as the perfect solution for the useage of the rest of the fabric. I found these instructions for the smocked top dress and at the end of this post I'll share the You Tube video.

This dress is definitely one that beginners in sewing or those who just want to make something very quickly and simply can do. The smocked top is actually not done by the traditional and time consuming method. This sweet dress is smocked using elastic thread in the bobbin. VOILA! Smocking on your sewing machine made by rows of stitches. Again, if you are interested in the 'how to' just watch the video at the end of this post.
My photos are not very clear but hopefully you can get an idea as to how simple and sweet this little dress is. And it is only 1/2 yard of fabric! Of course, the dress I made is about a size 3 little girl size, but by using more fabric you can actually make one for yourself or adults.

So here are my ONE YARD EASTER GIFTS that I will be wrapping up in a basket along with some bunny shaped frosted sugar cookies using my Grandmother's Rich Cookie dough recipe. I remember as a little girl (about 150 years ago) my Grandma coming to the house with a bowl of her freshly baked sugar cookies. I've never tasted better than hers, no matter who puts their name or gourmet label on them.

If you'd like to view the Martha Stewart video to make the summer smocked sundress, take a peek:


I had better get in the kitchen and mix up Grandma's Rich Cookie Dough recipe so I can roll them out and decorate them tomorrow.

Until later,

Cheers!

Jennifer

Thursday, April 21, 2011

Sending you Sunshine

I sure wish someone would send some sunshine and flowers my way! *smiles* We are still having days of snow, sleet and freezing rain and as of yet, no flowers have bloomed. sigh....... I'm so tired of winter! ESPECIALLY when the calendar says it is spring. But it isn't here yet.

So to stay away the winter doldrums I made this card using the smiling sunflower faces to cheer me. The sunflower stamp is another from Whipper Snapper Designs newest release set called "Garden of Friendship."


Garden of Friendship

The sentiment, "Sending you Sunshine and Flowers" is also from the set and really is what I need to read on these frosty cold days.

Not only that, but just look at all of the sentiments and detail stamps, as well as larger images that come in the set. The newest Whipper Snapper Designs releases are filled with stamps to keep your creative juices flowing.

That's all for today. I'm headed out to the barn this morning. It is the day the farrier comes to give all the horses their pedicures! **wink!** There is always lots of fun chat and interesting news shared between the other horse owners so it will be a good day, despite our cold temperatures.

I hope your day is filled with sunshine...and some flowers too!

Cheers!

Jennifer

Wednesday, April 20, 2011

Garden Fresh from Whipper Snapper Designs

I want to show you another Whipper Snapper Designs stamp set that has been released this week. I can't help but wonder if Anna Wight illustrated these stamp designs just for me?! I am going to be using this set for tags and labels for all of my canning and preserving this summer, as well as for cute cards.

Garden Fresh <------ Click on the words to take you to the site where you can purchase your very own set! **smiles**

I made a couple of cards to accompany some of my gift jars of jams, salsa, tomato sauce.
For a bit of a homespun touch I added ruffled lace and a safety pinned tag.

I tend to produce an overabundance of tomatoes from my garden each year. Last year my larder was full of jars of tomatoes, salsa, chili sauce and spaghetti sauce too. The following card will fit the bill for giving family and friends baskets and jars of canned yumminess.

For this jar, rather than coloring it, I decided to paper piece the "fabric" look jar topper and label and used some cotton thread to tie the lid.

I hope you are enjoying the new Whipper Snapper Designs stamp releases as much as I am. I have more cards to show you in the coming weeks. I hope your interest is piqued.
Until next time,
Cheers!

Jennifer

Tuesday, April 19, 2011

Recipe card and companion set

I'm really excited about the four new stamps sets that were released yesterday by Whipper Snapper Designs and illustrated by Anna Wight. Today I want to show you two more of the new sets in this new release. Keeping with the gardening, preserving and cooking theme are the recipe card stamp and the companion set to use with it:

Recipe Card <----- Click to take you to the site

Recipe Card Companions Set <------ Click to take you to the stamps

These two sets combined will make your recipes not only attractive but just think of the beautifully creative gifts you can make and give! Once I made the recipe card I realized how fun it would be using the companion set to the recipe card to create a card envelope to contain and present the recipe. I made a simple criss cross card (click HERE to view a simple criss cross card tutorial.)


See how your recipe card slides into the envelope? You could present several cards of different recipes in the same envelope. Or have you made a dish that your friends and family have been begging for your secret recipe? What a great way to present the culinary treasure to them! *smiles*

Because I make a variety of jams and preserves each summer I decided to use the specific fruit at the top of the card to make easy identification of the jam recipe.
I'm over the moon about Anna Wight illustrations for these sets!


For the tab at the top of the cards I used a Stampin' Up file tab punch. This made a great category identifier (as shown in here with DESSERTS) to keep your recipe card box orderly. The Companion set contains all categories as well as a variety of images.
Now just imagine how many times you are going to use these two sets! For myself, I'm just thankful you can't wear out rubber because I know I'll be making set after set of recipe cards. Some great gift giving ideas might be:


  • Bridal Shower gift


  • Children leaving the nest and needing Mom's good cooking help


  • Hostess gifts


  • Organizing your canning and preserving recipes in a special file (I KNOW I'm going to be doing this!)


  • Adding a cute recipe card to a homebaked bread or dessert or casserole.

    You get the idea!

Tomorrow I'll present another of the new WHIPPER SNAPPER DESIGNS April release set.

Cheers!
Jennifer

Monday, April 18, 2011

Garden of Friendship

Today is the day for the April Whipper Snapper Designs cling mount stamps release. There are four new sets and I know you will enjoy them just as much as I am! Each of the four new stamp sets released this month are of the gardening and cooking and preserving theme. I'll be sharing cards with you throughout this month using these wonderful sets. The first set I want to share is titled, "Garden of Friendship" and Anna Wight has done it again with her whimsical garden girl. Absolutely adorable.

One of the things I love about Whipper Snapper Designs is the huge selection of stamps and details included in each set. So many adorable detail stamps and sentiments to create unique and individualized cards. For this particular card I used copic markers to color and added a sweet almost calico print designer paper to the background from The Thrift Shop collection of October Afternoon designer papers.


Garden of Friendship


I'll have a lot more cards to come using this set as well as highlighting three more newly released sets. I know they will be well loved and used stamp sets.


Until next time,


Cheers!


Jennifer

Thursday, April 14, 2011

...Peter Cottontail hopping down the bunny trail

"Here comes Peter Cottontail, Hopping down the bunny trial. Hippity, hoppity Easter's on its way." Yesterday I discovered this free downloadable pattern, created by The Polka-Dot Umbrella HERE for this sweet bunny. Being impulsive, I printed the pattern and put all other chores aside for the day to make this darling bunny. He's so sweet and cuddleable that I made him some soft eggs to deliver in matching colors.
For the most part I followed the directions given. However, the designer didn't line or interface the ears, and while one definitely wants them floppy, I decided to line the ears with a flat quilt batting. They are still quite floppy but don't hang limply from him. And for the face and hands I used ultrasuede scraps instead of felt. I just love his sweet embroidered nose and mouth. The buttons were in my stash of buttons and matched the fabric perfectly. A couple of weeks ago I posted some soft bunnies and eggs that I had made. The eggs were designed by Retro-mama and you can find the directions on her blog HERE. Ooohhh...and look at his cute little cottontail. Actually, his tail is white felt and using a satin stitch attached it to his puffy bum. Isn't the purple floral fabric yummy?! I love it. It is "Sonoma" by Franchelle Contreras for Henry Glass Fabrics. Tomorrow I'll show you another sneak peek using this lovely fabric. I really enjoyed making this bunny. And just wait until tomorrow to see the rest of the Easter Accessories that will accompany him. Until then, Cheers! Jennifer

Tuesday, April 12, 2011

Quilted Laptop Bag

Last summer my sister asked me if I might be able to make her a carrying case/totebag for her new laptop computer. She had seen some beautiful Vera Bradley quilted bags that she liked a lot and I didn't see a problem at all to replicate a Vera Bradley knock-off design using some lovely floral quilted fabric. So Mary Kathryn went to JoAnn's and found this GORGEOUS floral striped quilted fabric. The reverse side of the fabric is solid purple floral (no stripes) and that is the inside of the case. I didn't think this should be a difficult tote to make but since she lives in the U.S.A. and I'm in Canada, I didn't want to guestimate sizes and construction because we aren't close geographically to "fit" or make adjustments once I began cutting and sewing. I did, however, find this wonderful Simplicity Pattern # 3889 for a variety of sizes and styles for laptop computer bags and decided to use it. The inside of the computer bag has pockets for pens and pencils as well as a pocket to slip cords or the mouse into. I just love the purple floral inside of the case just as much as the striped outside. This laptop totebag closes with two zippers that run from the center top around to the bottom. The outside has a large pocket on both sides to drop a notepad, tablet or books.

This was a lot of fun to make. It wasn't terribly difficult, though I would not recommend this for a beginner to sewing. Some of the instructions on the pattern rely on the needleperson to intuitively, or through experience, know how to apply binding, zippers in an inconventional useage and manner. Also, I wouldn't recommend this project for a sewing machine that wasn't, shall we say, substantial. There are a lot of layers, cord and fabric that needs to go through the machine. The layers where one is sewing through the front, inside and pocket layers gave my machine some groans. All in all, though, it went together fairly easily and I would love to make another one. In fact, I'm considering the envelope style pouch for my KOBO e-reader. Now I'm off to mail the bag to my sister. I've put this off for so long and she's not complained once that I haven't gotten it mailed to her.

And because I am so late in mailing this to her, I'm tucking in an apology card. My sister knits beautifully so I thought she might forgive me if I apologized for my tardiness with this "sorry to be such a Knit Wit" card.
Thanks for stopping by!

Cheers!

Jennifer

Sunday, April 10, 2011

Blue Delft Tile card

A couple of weeks ago at Splitcoast Stampers, the Wednesday Tutorial was how to make a Delft Tile card. I've always loved Blue Delft Tile and while I do not own any, I admire it greatly. Delftware, or Delft pottery, or Blue Delft tile refers to blue and white pottery made in and/or around Delft in the Netherlands and the tin-glazed pottery made in the Netherlands from the 16th century. This is an example of Blue Delft tile: The process to make the card was quite simple and involved a large background stamp (I used a Stampin' Up! Floral background stamp) and stamped it in blue ink, scored the image into a tiles and then added a bit of grey highlights to replicate the grout between the tiles. You can find the complete tutorial presented at Splitcoast Stampers HERE. My center stamps is also a Stampin' up stamp from an old and well loved little set called "Flowers of Gratitude." The sentiment is from Stampin' Up! as well. Finally, after mounting the image I added some blue pearls. In the centers of the flowers I added tiny light grey pearls. I thought the pearls added the ceramic and shiney look of glazed tile. What do you think? This Delft tile technique was a lot of fun to make. In fact, I found some other background stamps that I think will be a lot of fun to make a Delft Tile Card with.

Until next time,
Cheers!

Jennifer

Friday, April 1, 2011

A little denim jumper

The other day I was sent a picture of a little denim jumper and asked if I thought I could make something like it. The photo was of a ready made jumper and retailed for $38 and that price is before taxes and shipping were added on. "WHAT??!!", I exclaimed! "Over $40 for a simple little jumper for a toddler? That's outrageous! I can make that for a couple of bucks and have it ready to wear in a couple short hours."

The gauntlet had been thrown and now it was time for me to set about doing exactly what I claimed I could. For all intents and purposes, this little jumper looks identical to the expensive designer outfit. I didn't have a pattern and quite frankly, I didn't know exactly how long it should be or even what our little sweetheart's chest size and shoulder width is. You see, once I get an idea into my head I just start cutting and sewing and "winging it."

All the rage in little girls' summer frocks appears to be the Pillowcase Style garment. As I looked at the photo of the designer jumper I decided that that is all it was, i.e. a pillowcase dress made of denim with a casing and a self drawn tie for to create the shoulders and to tie into a bow. An advantage of the casing style with the sash drawn through it is that as the child grows you merely loosen the drawn sash to expand the chest breadth.

The photo in the magazine of the ready -to- wear version had a cute apple fabric for the hemmed trim, pockets and sash. I didn't happen to have the identical in my fabric but I did think this tiny butterfly print in green, blue and a bit of pink would work perfectly. The patch pockets were created from the bottom of my spray bottle sitting on my ironing board to create the rounded edges and then I cut the top straight. I always line my pockets. They hang better on the garment and are more sturdy.


For the hem trim I interfaced with a medium weight interfacing. It is made with a long piece of fabric folded in half and then half is interfaced and the rest is folded to the inside, then showing no raw edges. Because the demin has a bit more heft, I knew that the cotton fabric would need support of a good interfacing. I was tempted to post side by side photos of my little dress and the expensive online version, but decided that I didn't want to give free publicity to the company selling and making them.


This really did go together in less than two hours. I spent a lot of time looking at the photo of the ready made jumper and visually and mentally disecting it until I had a plan.


Our special little friend just received it this morning so perhaps I can get a photo of her modeling it. She is going to go to part time pre-school this fall and I think (I hope!) this will be an easy to wear and fun jumper to wear to 'school.'


OH! I have two little tiny antique metal butterfly buttons. I started to sew them on at the top of the jumper and then kept changing my mind. They match perfectly with the print, but I didn't know if it would be too much with the drawn sash tie at the top. As well, perhaps for safety reasons one shouldn't put metal buttons on toddler's garments? I don't know. What do you think?


Thanks for stopping by!


Cheers!


Jennifer